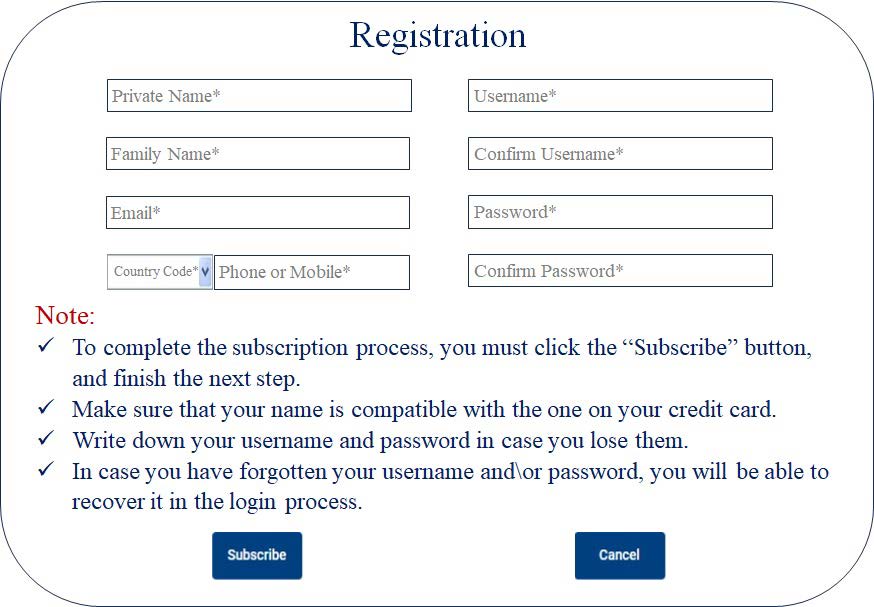
- You start by taking the subscription process by clicking the “Subscribe” button.
- The first step is registration, immediately after, you will finish the subscription process. If you don’t finish it, you will terminate the subscription.
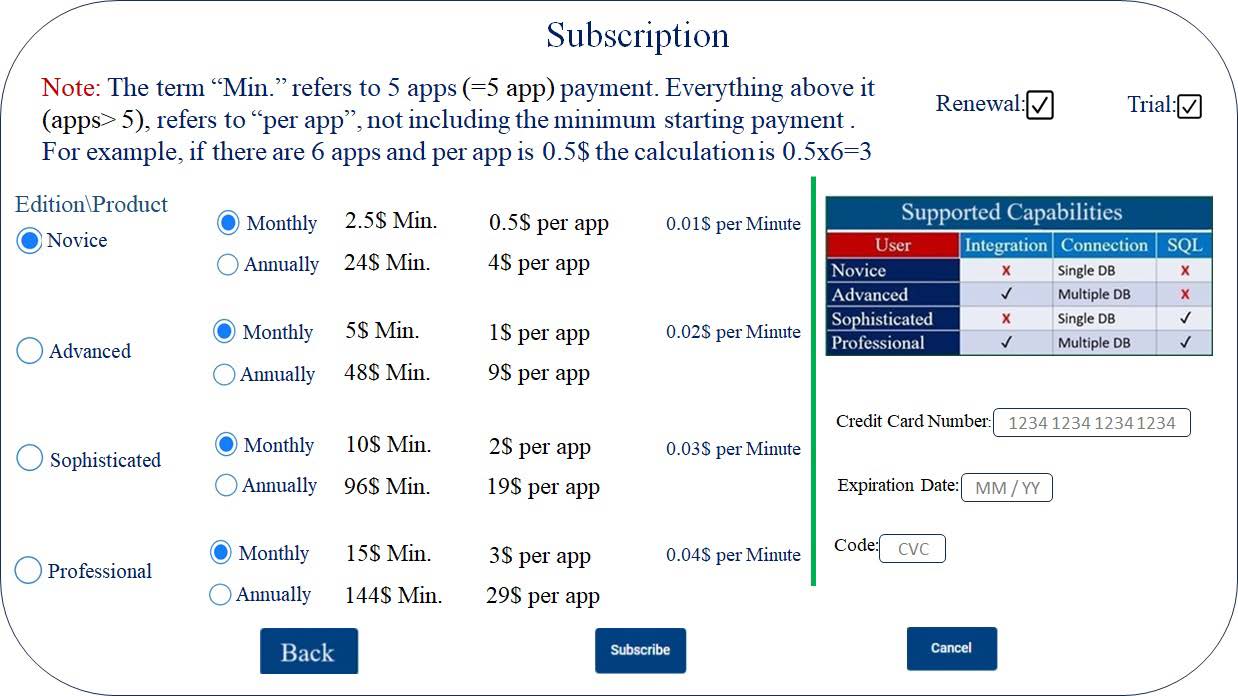
- to open the POL platform in the web browser, click the “POL Platform” button and put the Username and Password in the login dialogue box which you get in the registration process. No installation is needed because it is a cloud platform (SAAS).
Note:
The “Subscribe” button and “POL Platform” button are at the right corner of the website.
There are three basic components\steps in creating POL’s application.
- The Virtual Table:
- This is a submenu item of the main menu item, “Add” which is a graphic object in an image of a table that you Drag & Drop onto the canvas (working space) that creates a table on the canvas which you load into it a database table through a browser connected to the database. This applies to the Novice and Advanced editions of POL which did not require any previous knowledge.
- In the case of those users who know how to create database queries, which applies to the Sophisticated and Professional editions of POL, the Virtual Table will be filled with database query results (view).
- On top of this table (which contains a database table or query results- view), the user can perform a point & click operation, exactly like in a spreadsheet (like Excel).
- Unlike spreadsheets, no need to define a range or copy the formula to all the records.
- There is a single formula created by the point & click operation.
- This formula works on an unlimited number of records (billions and more).
- When you drag & drop the table to the canvas (working space\environment) or select one that is already being dropped, on the left side of the canvas, will appear the properties panel.

This panel represents most of the operations made in the application.
2. The second stage is to connect a data source to the Virtual Table.
- You click on the “Select Data Source” in the Virtual Table panel (above) and the Data Source dialogue box will appear.
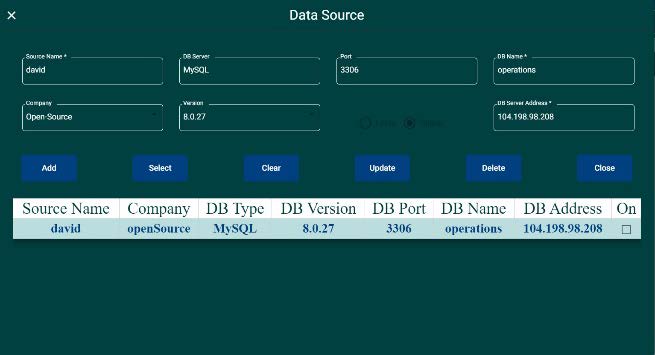
2. You will get from your Database Administrator all the data needed to connect to this database.
Note: You can connect to a remote database server by using the server’s name or its IP address.
You will connect in a much easier way to a local database server you install on your local machine.
3. After filling in all the data, you will click on the “Add” button and it will be added to the table at the bottom of the Data Source dialogue box.
4. The next step is to click the check button located on the row added to this table and a login dialogue box will appear, enabling you to enter your username and password to connect to this data source.
5. The next step is to click on this row to select it and click the Select button (above the table).
6. The Data Source dialogue box will close, the “Select Data Source” button becomes disabled and the “Select DB Table” button that previously was disabled is now enabled. The data source is now connected to the Virtual Table.
7. You click on the “Select DB Table” button and the database tables will appear in a list.
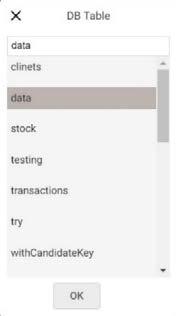
8. You select one of the tables and click the “OK” button. There could be thousands of tables in a database, to find your table more easily, there is a field at the top of the list where you can type the first letters of the table name and you will get similar names with proximity to the name. With slight scrolling, you will find the desired name. The data of the database table will fill the Virtual Table.
9. The next step is to do Point & Click operation as in spreadsheets like Excel and other spreadsheets on top of the Virtual Table to create POL’s Formula.
10. You can change the default name of the Virtual Table name into a logical arbitrary name of your consideration. This name can be changed before or after creating POL’s formula and will appear in the formula syntax. After creating POL’s formulas, clicking “Enter” will put them in POL’s tab one after another.
11. POL’s formula contains pointers of different Virtual Tables, which means that you can perform Point & Click operations on different Virtual Tables.
12. POL’s formula syntax is:
- Pointer- Virtual Tables name: [relative column location, relative row location].
- Definition- relative means the relative location to the output cell. The relative direction of the column is, to the left of the output cell is negative and to the right is positive. The relative direction of the row is, above the output cell is negative, and the below is positive.
- Output- On the left side of the equation the syntax is, Virtual Tables name: (output column, general parameters separated by comma).
- Example- Cumulative: (2, 3) = Cumulative: [-1, 0] + Cumulative: [0, -1].
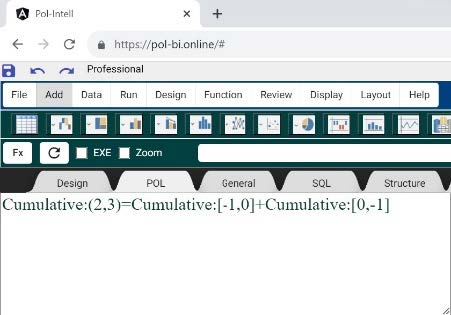
- You can also see it in POL’s tab and add the formula manually or change the existing one.
Note: Creating a formula can be on data of selected database table or database query (SQL) results.
The Sophisticated and Professional editions of POL can generate database queries (SQL).
3. The third stage is to create a Data Link. The purpose Data Link is to connect the Virtual Table Data Source to the Data Link and the database query (SQL) it contains.
- The Data Link is created automatically in the Novice and Advanced editions of POL, but it is invisible.
- The Data Link is created by the users of the Sophisticated and Professional editions of POL, and they can fill it with query syntax (SQL) or generate it automatically using a Visual Query Builder tool.
- The table properties panel of the Sophisticated and Professional editions of POL, are different as you can see below.
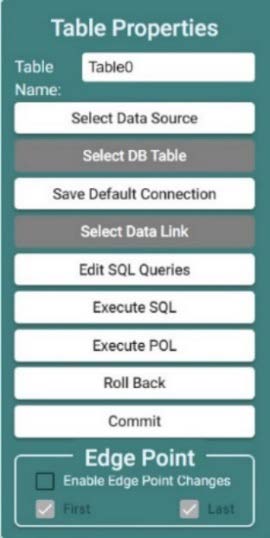
Note: as you can see, in the Virtual Table panel of the Sophisticated and Professional editions of POL, there are three additional buttons, “Select Data Link”, “Edite SQL Queries” and “Execute SQL” which enable to create POL formula on top of database query result represent in the Virtual Table.
4. After clicking the “Select Data Source” button and selecting a data source the button will become disabled and the disabled button of the “Select Data Link” will become enabled. When you click on this button the Data Link dialogue box below will appear.
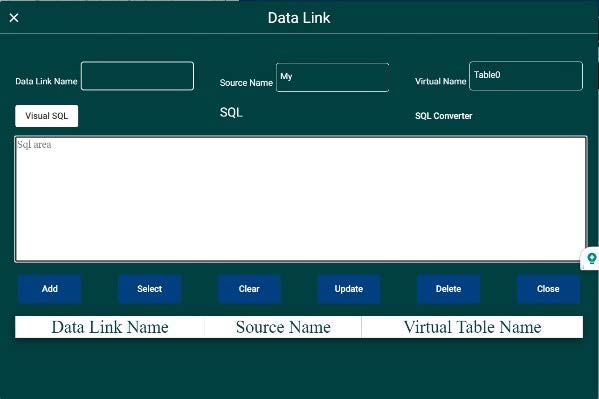
5. As you can see you can see, the names of the arbitrary names you gave the Virtual Table, and the Data Source already appears in this dialogue box because they are linked automatically. You also give an arbitrary name to the Data Link.
6. You can type in the database query (SQL) in the editor (above the buttons) or click on the button Visual SQL (on the left above the editor) and open a Visual Query Builder tool that will enable you to visually generate even complex database query (SQL).
7. You can use the link at the right above the editor “SQL Converter” to convert the SQL syntax to another database.
8. After you fill in all the details, you click on the “Add” button and it will appear on the table at the bottom. You click on the row, select it, and click the “Select” button. The Data Link dialogue box will be closed, and the query result will appear in the Virtual Table.
9. At this stage you can perform Point & Click operations on top of this result or several results in different Virtual Tables.
10. The Roll Back button enables you to reset the database table or query result (note: database term) and start over. The Commit button enables you to save the result into the database.
11. Whenever you save a file, when loaded, it automatically executes data processing according to the last definition. You can also use the “Run” menu item to determine how it executes data processing when loaded.

- If the check button “EXE” is marked, whenever a file is opened, it immediately executes the processes according to the option chosen in the radio buttons.
- If you choose the “SQL” option, it will only execute the queries in all the Data links according to their order, which is also the default process definition. The default state of the “SQL” radio button should be marked. The reason: An application can process millions of records and in design time, we don’t want to wait for the processing of millions of records by POL’s formulas.
Note: The default state is crucial because data are changed by hundreds, thousands, or many more users, and also the company processing software. POL must process the data on loading if we want to get Up-to-date data online.
3. If the “POL” radio button is selected, first the query is processed according to the “Data Link” order and after that according to the order of POL’s formula (in POL’s tab).
- The green arrow is used to run the processes according to the radio button selection but only in design mode.
- The circular arrow is used to roll back (reset) all the queries and Virtual Tables. in design mode
Note: The “commit” query can be performed with or without the “commit” button.
4. In some cases, you will not have Read-Write authorization, but you can still perform POL’s operation.
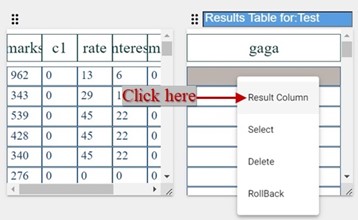
- To do so, click the right mouse button inside the virtual table and a pop-up menu will appear.
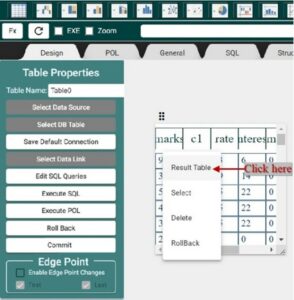
Choose the “Result Table” item on this menu.
- After that fill in the parameters inside the “Data Source” dialogue box and choose a database server and\or database even those different from the “Input Table”.
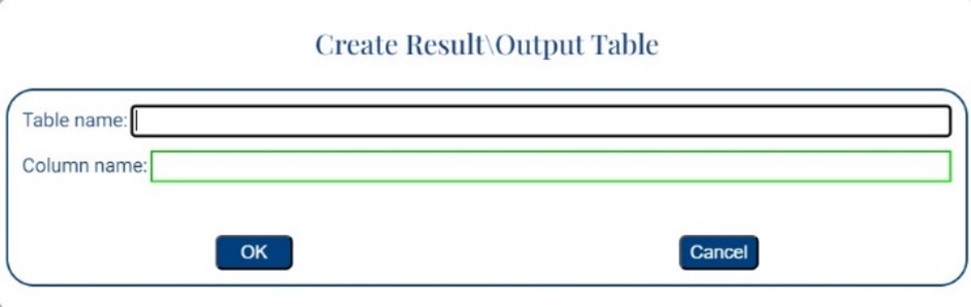
- After that, you will see the dialogue box below that will enable you to choose the name of the database table and the result column. This applies not only to a selected table but also to a query view inside the virtual table.
- If you want to add columns to this table, simply click the right mouse button on this table, and the pop-up menu will appear with the item “Result Column”.
- After you click the “Result Column”, the dialogue box below will enable you to give a name to this table.
Before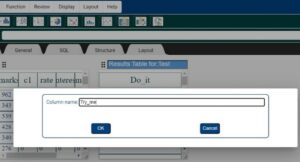 After
After 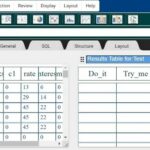
5. Whenever the user clicks the keyboard Equal Sign (“=“) inside the virtual table, POL checks inside the query it contains to see whether the database table of the result column where the user clicked has any unique type column or not and if there is none, it will load this dialog box below.
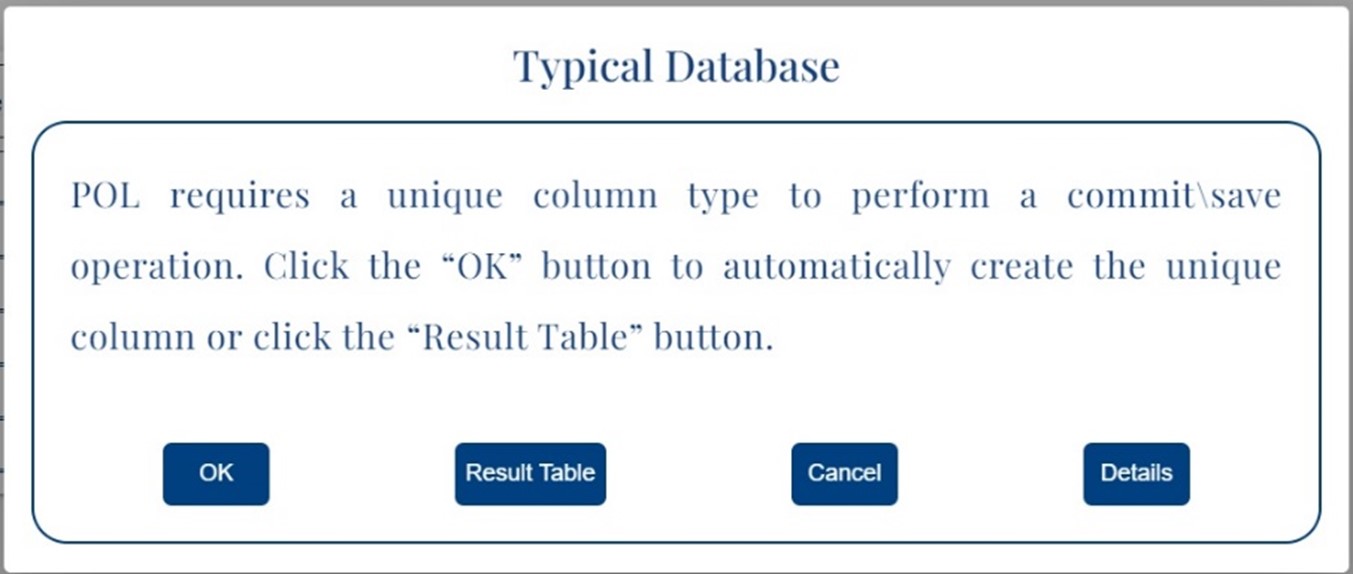
- If he clicks the “OK” button, it will automatically create a unique column for this database table.
- If he clicks the “Result Table” button, he will get the dialogue box below.
- If he clicks the “Details” button, he will get the dialogue box after the one below.
- After clicking the “OK” button in the dialogue box above, from this point onwards the procedure is the same as in paragraph “4)”, subparagraph “b.” till the end of paragraph “4)”.
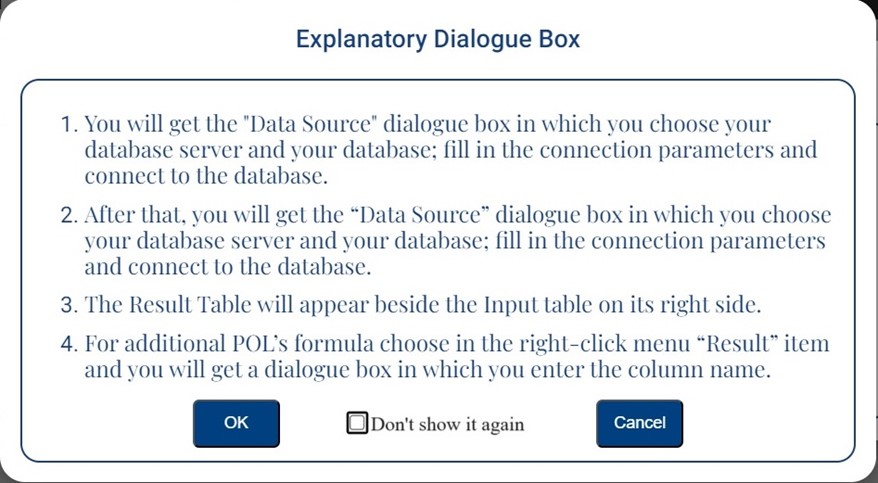
- Clicking on the “Details” button in the dialogue box at the beginning of this paragraph (5) will open the dialogue box below.
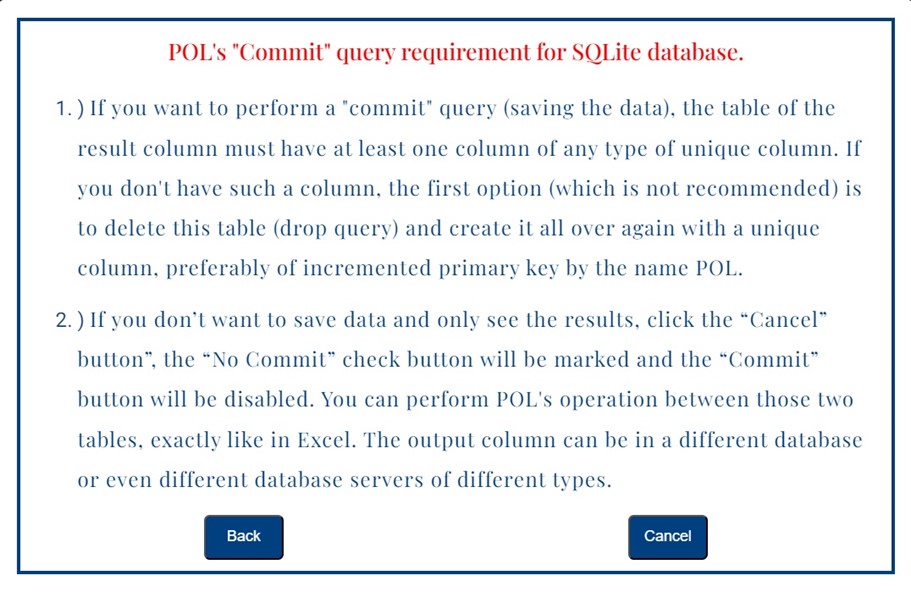
6. This paragraph is almost the same as the previous one except for creating a unique column (“OK” button).
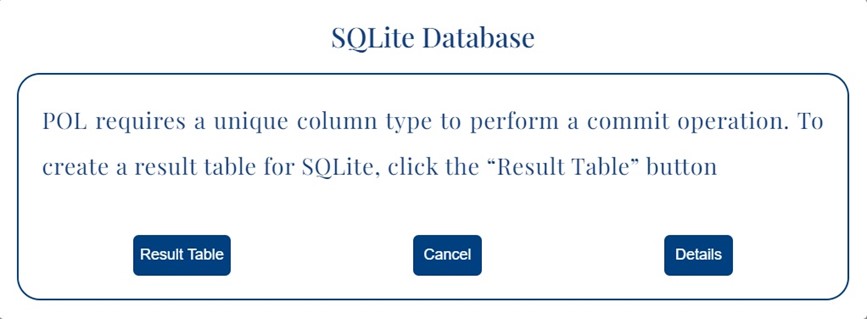
- This paragraph explains the difference between an SQLite database and the previous paragraph which explains a typical database.
- You can’t create a unique column in a table of SQLite database.
- The only solution is to create a “Result Table (see the dialogue box below).
- Clicking the “Details” button will open the dialogue box below.
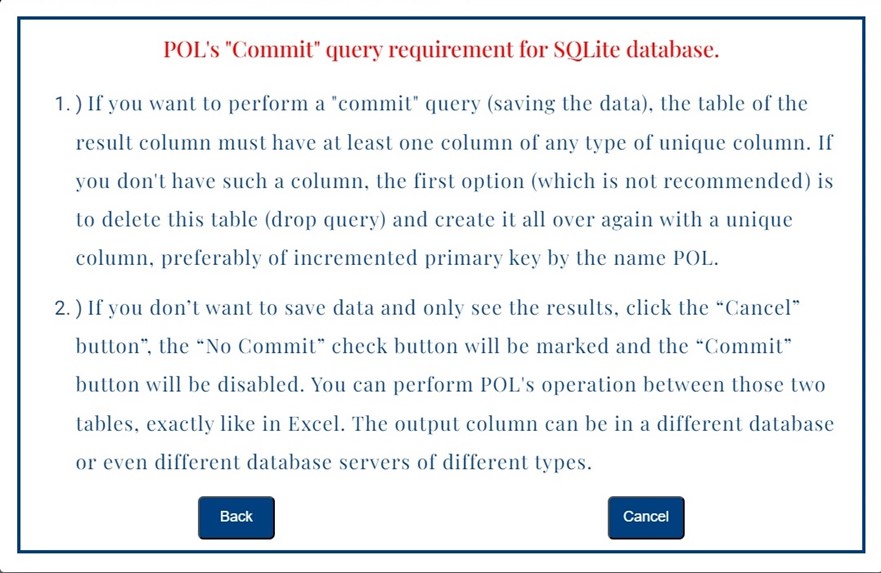
7. The subparagraph below can explain the paragraph above.
- No other parameters are needed for the SQLite database server.
- SQLite doesn’t require a username and password.
- After you “Add” this “Data Source”\Connection to the list, it will connect to the database automatically.
- You can also connect to any remote or local database as long as they are the type of database server we support, which are: MySQL or PostgreSQL, and you can also install SQLite on your computer. SQLite is the easiest database to install and configure.
- The Port number parameter is automatically selected whenever you select the corresponding database server. If you connect to a different remote database with a port number other than the default port number, you can change it accordingly.
Connection parameters to our databases
MySQL
Source Name: An arbitrary name given by the user, Company: Open-Source, DB Server: MySQL, Version: 8.0.27, Port: 3306, DB Name: operations, DB Server Adress: pol-data.com.
Database Login
Username: roots, Password: roots@123
PostgreSQL
Source Name: ???, Company: Open-Source, DB Server: PostgreSQL, Version: 11.14, Port: 5432, DB Name: pol_post, DB Server Adress: pol-cloud.com.
Database Login
Username: Postgres, Password: dave123
SQLite
Source Name: ???, Company: Open-Source, DB Server: SQLite.
Thank you for your patience and have a fantastic day.